You can install off-road lights without using a relay by direct wiring. Select the lights, a power supply, and a resistor that can handle the lighting system.
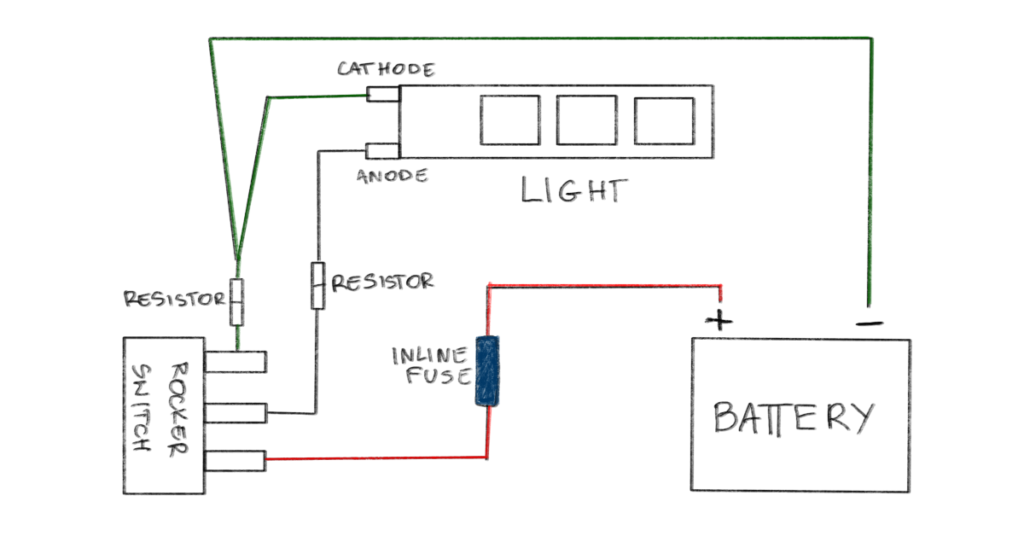
Connect the first terminal of the rocker switch to the cathode of light and negative terminal of the battery, then connect the middle terminal to the anode of light, and the last terminal is connected to the positive terminal of the battery or power supply. The resistors are installed at the first two terminals.
Do I Need The Relay For Off-road Lighting?
Relays are not necessary for off-road lights; when you are not using a relay, the control switch must be able to handle the current load of the installed lights. The relays are used in high-powered lights; installing the switch with an inline fuse for the low-powered lights is good.
If the current increases, the switch should be big enough to handle it. Relays are recommended because they will maintain the current flow and do not heat the switch. If the switch is overheated because of high current, it will reduce the current flow, making the lights less bright.
Things To Understand Before Installing the Off-Road Lights Without Relays:
- If you are not using a relay, use materials that can handle the heat produced by the off-road lighting system.
- Minimum 14ga wire should be used in the connection without a relay; 12ga or 10ga can give extra safety margin and allow higher Walt lights in the future.
- Use a Switch that can handle the heat produced by the Off-Road Lighting System. The switch must be compatible with the Vehicle.
- Make sure the connection without relay is only for the lights. Using other things like phone chargers etc., can end up burning the fuses again and again.
- There are three types of off-road lights, halogen, HID, and LED. For each type, you can wire them without relays only if the voltage and watts are compatible. Halogen and HID lights become much hotter than LED lights. So, with LED lights, you have more gape for Watts to install them without a Relay.
How To Wire Off-Road Lights Without Relay?
Wiring offroad lights without a relay is the step by step process. First, you have to go through some things before you can mount and wire the lights in the Vehicle.
Parts and Tools Required
- Lights
- Rocker Switch
- Resistors
- Wires
- Light Harnesses
- Socket Sets
- Drills, Bits, Self-tapping screws
- Electrical Tape
- Electric toolbox
Choose your lights
First of all, select the lights. Halogen lights do not have much illumination or life span. HID lights have much better illumination, but they degrade over time. Both of these lights get overheated very fast; on the other hand, the LEDs do not get heated that fast; LEDs are much more reliable new technology with higher illumination and lifespan.
LEDs are best if you are wiring the lights without a relay. If you want to wire Halogens or HIDs, they should be compatible with the wiring material. You have to choose from Light Bars, Spotlights, Floodlights, or a combined system of off-road lights.
The Power Supply is the other main item. The Power Supply must be compatible with lights in terms of voltage and Watts, and amperage. You must select all the lights with the same voltage, watt, and amperage.
You have to pick the correct resistor. To select the correct resistor, you have to calculate the amperage draw from the voltage and amperage of the lighting system because the high currents are disastrous and may cause the lights to burst. The formula to calculate the amp draw is Watts = Amps x Volts.
For example, your light is 55 Watts, the engine running voltage (13.8vdc) gets us 3.9855.. amps, and the engine off voltage (11.8vdc) gets us 4.661… amps. These calculations are for the 12V car system. For the multiple lights, you must add the watts for all lights and then calculate the amps. You can also select the switch according to this amperage.
Wire The Lights to The Switch
First, make sure the switch is in the “off” position for safety purposes; the rocker switch has three terminals. Connect one side of the resistor to the first switch terminal and use a copper wire to connect them.
You must solder these connections at both ends to the switch and resistor. It is recommended to select the wire as mentioned above. This wire will be connected to the cathode of light and the negative side of the battery.
Connect the second middle terminal of the switch to the anode of the light. You can also use a resistor in between this connection
Now connect the last switch terminal to the positive side of the power supply; it can be the battery or any wire coming from the battery. Solder the connections if needed. An inline fuse is a must in this connection.
After all the connections are made, check if the light works by pressing the switch on and off. Once you know it is working, disconnect the battery’s negative terminal to work on the next step. The wiring diagram is given below.
Mount The Off-road Light Onto The Vehicle
Mounting the lights is based on which off-road light you want to install on the Vehicle, as I mentioned before, the lightbar, spotlights, or the floodlights, all these lights are mounted differently, but their wiring will be the same if you want to install the off-road lights without the relay.
Either you can mount these lights on the assigned positions on the Vehicle, or you can be creative with the mounting position.
Once you have decided the place of mounting, secure it with the brackets provided with the lights. The Law and Regulations of Off-road lighting should be followed.
Install the Switch
Before starting the switch installation, it is a must to do the step that you should disconnect the negative terminal of your battery. This step means there will be no current in the system till you again connect the negative terminal. It is to prevent you from any shocks or injuries.
Find an easily accessible place in your Vehicle where you can reach without looking, so you don’t have to find the switch while driving. You have already wired the switch in the second step; repeat the step if you have multiple lights and want separate switches for each light.
The next step is to run the switch wires through the engine bay. You can use the existing grommet with direct access to the engine or carefully poke the grommet in the firewall.
The wire will be directly connected from the switch to the light. Connecting a backup cable will be a good idea here; to do that, connect another wire to the ring terminal, which should be earthed.
Install Harnesses
One of the most important steps is to use all the remaining plugs. For that, you can use harnesses after you are done wiring all the lights. Connect a single plug to the switch and the other to any power source which is earthed.
This earthed power source can be the negative terminal of your battery or any bare metal bot that directly connects to the car’s body. Make sure no plug is remaining in the switches. The last connection will be the lights to the circuit.
Wrap-Up And Test The Off-road Lights
The final step is the wrap-up, but before that, clean the system and ensure safety. Tape any naked plug or loose wire. Finally, connect the negative terminal of your battery and check if the off-road lights are working perfectly.
Pros And Cons of Not Using a Relay For Off-Road Lights
Pros
- Relays are slow the response; you can quickly turn the lights on and off without having relays
- Relay is an extra part of the electrical system, so it requires extra safety; it may cause ignition of sparks when it is vulnerable to normal wear and tear
- You can use microelectronic circuit systems
Cons
- Switches may sometimes overheat if you are not using a relay
- Switches alone cannot control the high current of high-powered lights. It can result in a disaster
- Sometimes if you don’t use a relay, the lights may be feeble; at that time, you have to install the relay for full bright lights
Conclusion
Relays are used to switch low currents to high currents, reverse the polarity, switch the circuit on or off, and much more, but they are not a must to install the off-road lights in your Vehicle.
You can install off-road lights without using a relay by following the few simple steps of direct wiring. First, you have to select the lights, a power supply compatible with the lights, and a resistor that can handle the lighting system’s amperage.
Connect the first terminal of the rocker switch to the cathode of light and negative terminal of the battery, then connect the middle terminal to the anode of light, and the last terminal is connected to the positive terminal of the battery or power supply.
The resistors are installed at the first two terminals. Following this procedure of wiring, you can mount the lights and switches into the Vehicle.

- Tips and tricks For Setting Up Camp Like a Pro - September 11, 2023
- The Best Multi-Tools for Overlanding Adventures - August 25, 2023
- Off-Road Navigation Tips for Overlanders - August 13, 2023